Download the VirtualPBX Softphone
You can find the app in the Google Store under “VirtualPBX Phone”, or download from virtualpbx.com/apps
Create A Softphone
You must be a VirtualPBX administrator to complete these tasks

- In the Dashboard, click on Users
- Click Devices alongside the user you wish to assign the device
- Click Choose Device and select Softphone

1: Click the toggle from “Use 3rd Party Application” - It should switch to “Use VPBX Application”.
2: Enter a name for the softphone so you can identify it on the Dashboard.
3: Click “Create Device”. The email address you use for login should now receive an email from support@virtualpbx.com with your softphone credentials.
Softphone Overview
Once you’ve logged into the softphone and applied permissions you will see the dialpad
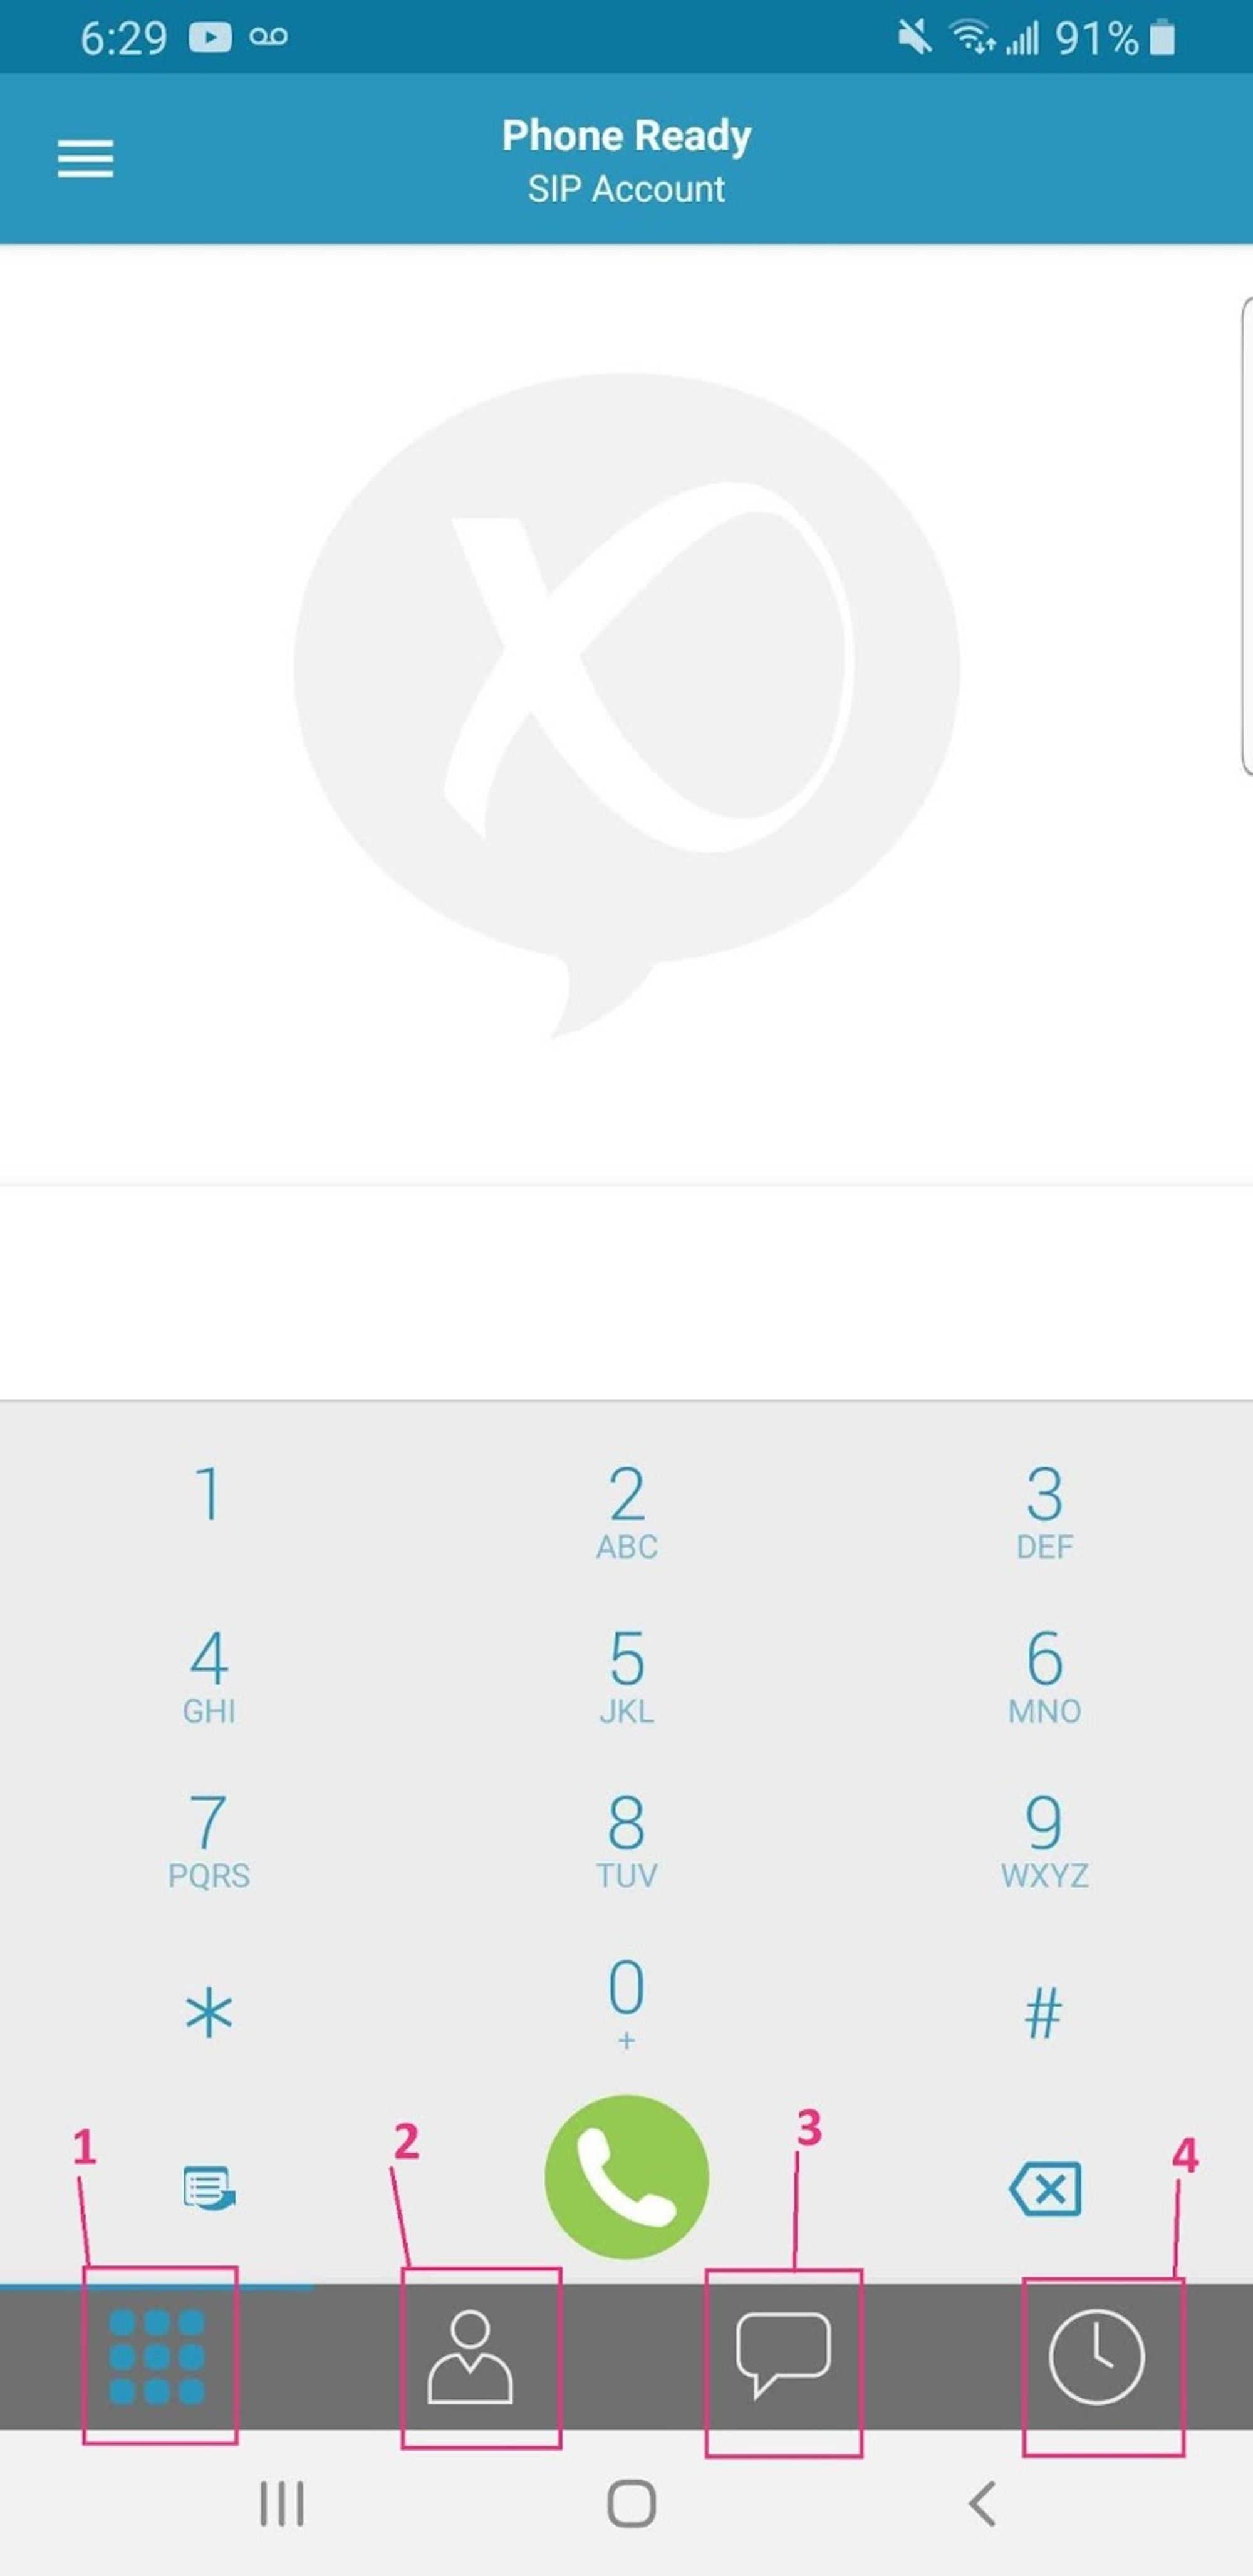
1: Return to the dialpad
2: View contacts
3: Texting / IM
4: Call history
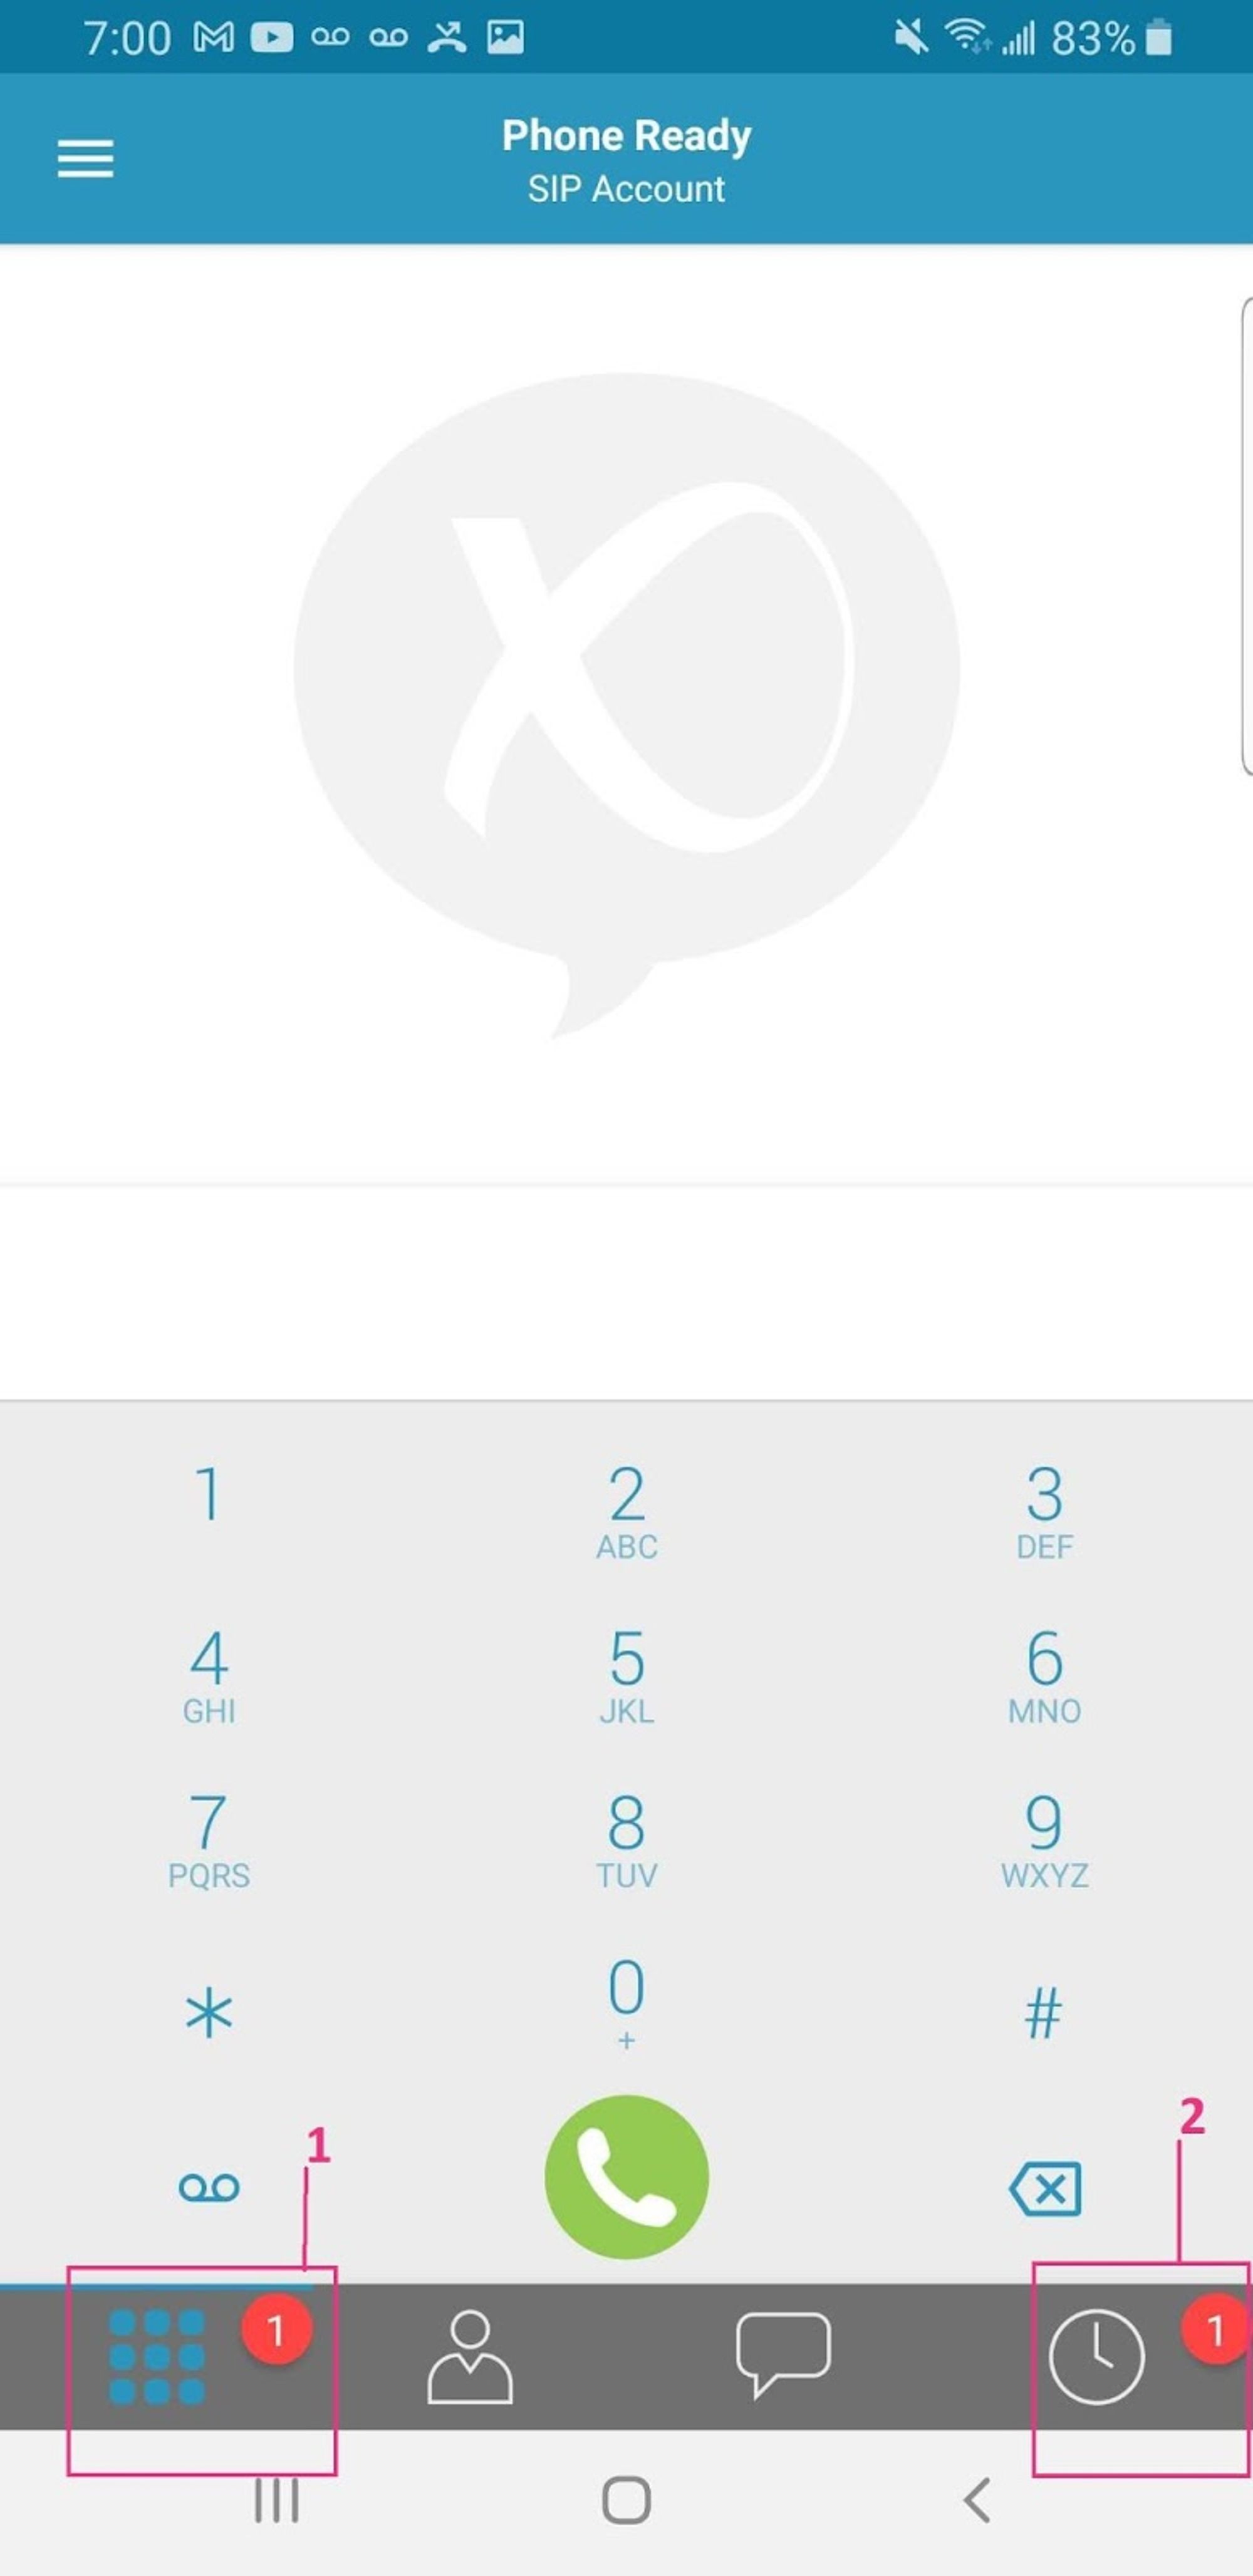
- A number on the dialpad icon indicates new voicemail
- A number next to call history indicates a missed call
Contacts

1: Contacts: The Contacts screen allows you to import your cell phone contacts into the Softphone app
2: Roster: List of softphone contacts available in your organization (Flex plans only)
3: Favorites: Make a frequently called contact a favorite to easily find them here instead of going through your full contacts list
Call History

You can choose to look at your entire call history or just your missed calls
- Tap on the phone icon to call the person back
- Tap on the 3 dots to clear call history. You can clear All, Missed, or Conference Entries separately
Instant Messaging
NOTE: Texting/IM features will only work with specific plans and settings. If you are interested in this feature please contact our Account Services Team

1: IM - This is used to send an instant message to another softphone contact in your company
2: SMS - This is used to send a SMS message out to an external number
3: Rooms - This is used to create a chat room for multiple people to message one another
4: New Message - Select this to choose the recipients and begin composing your message
Transferring Calls
- Warm Transfers – Introduce your caller before completing transfer
- Cold Transfers – Immediately transfer your caller
Warm Transfers
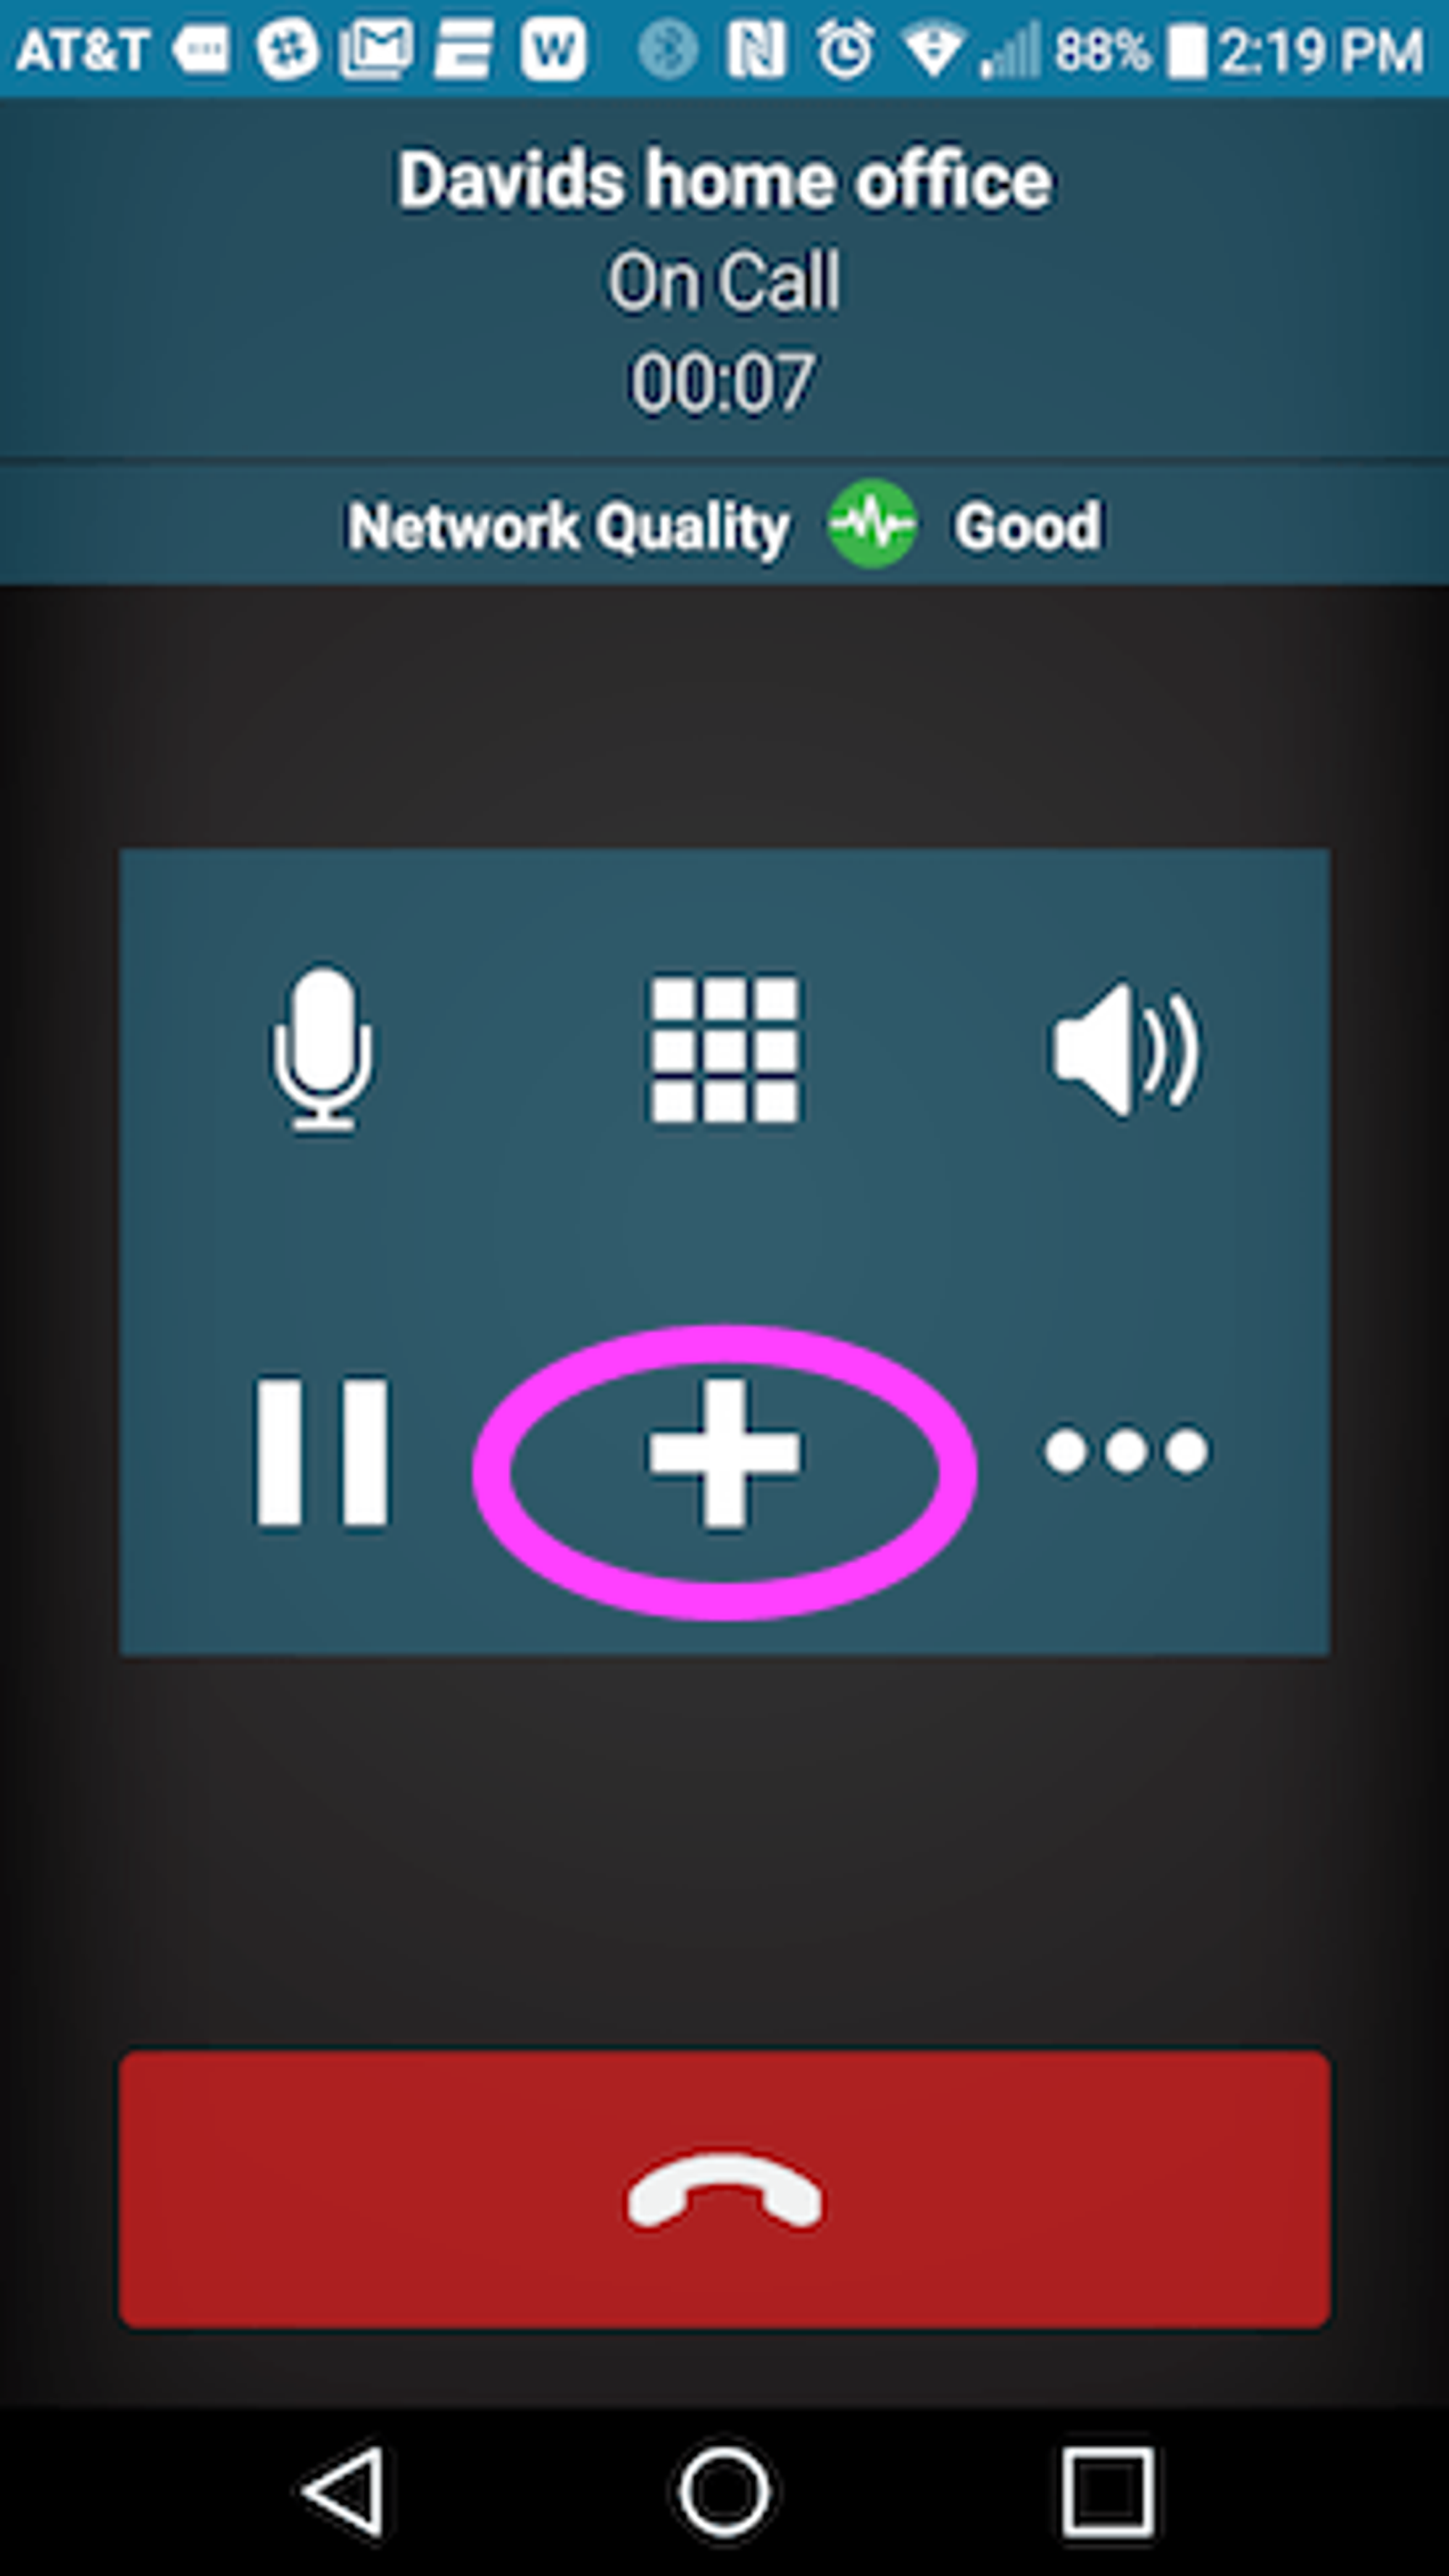
- While on a call press the + sign.
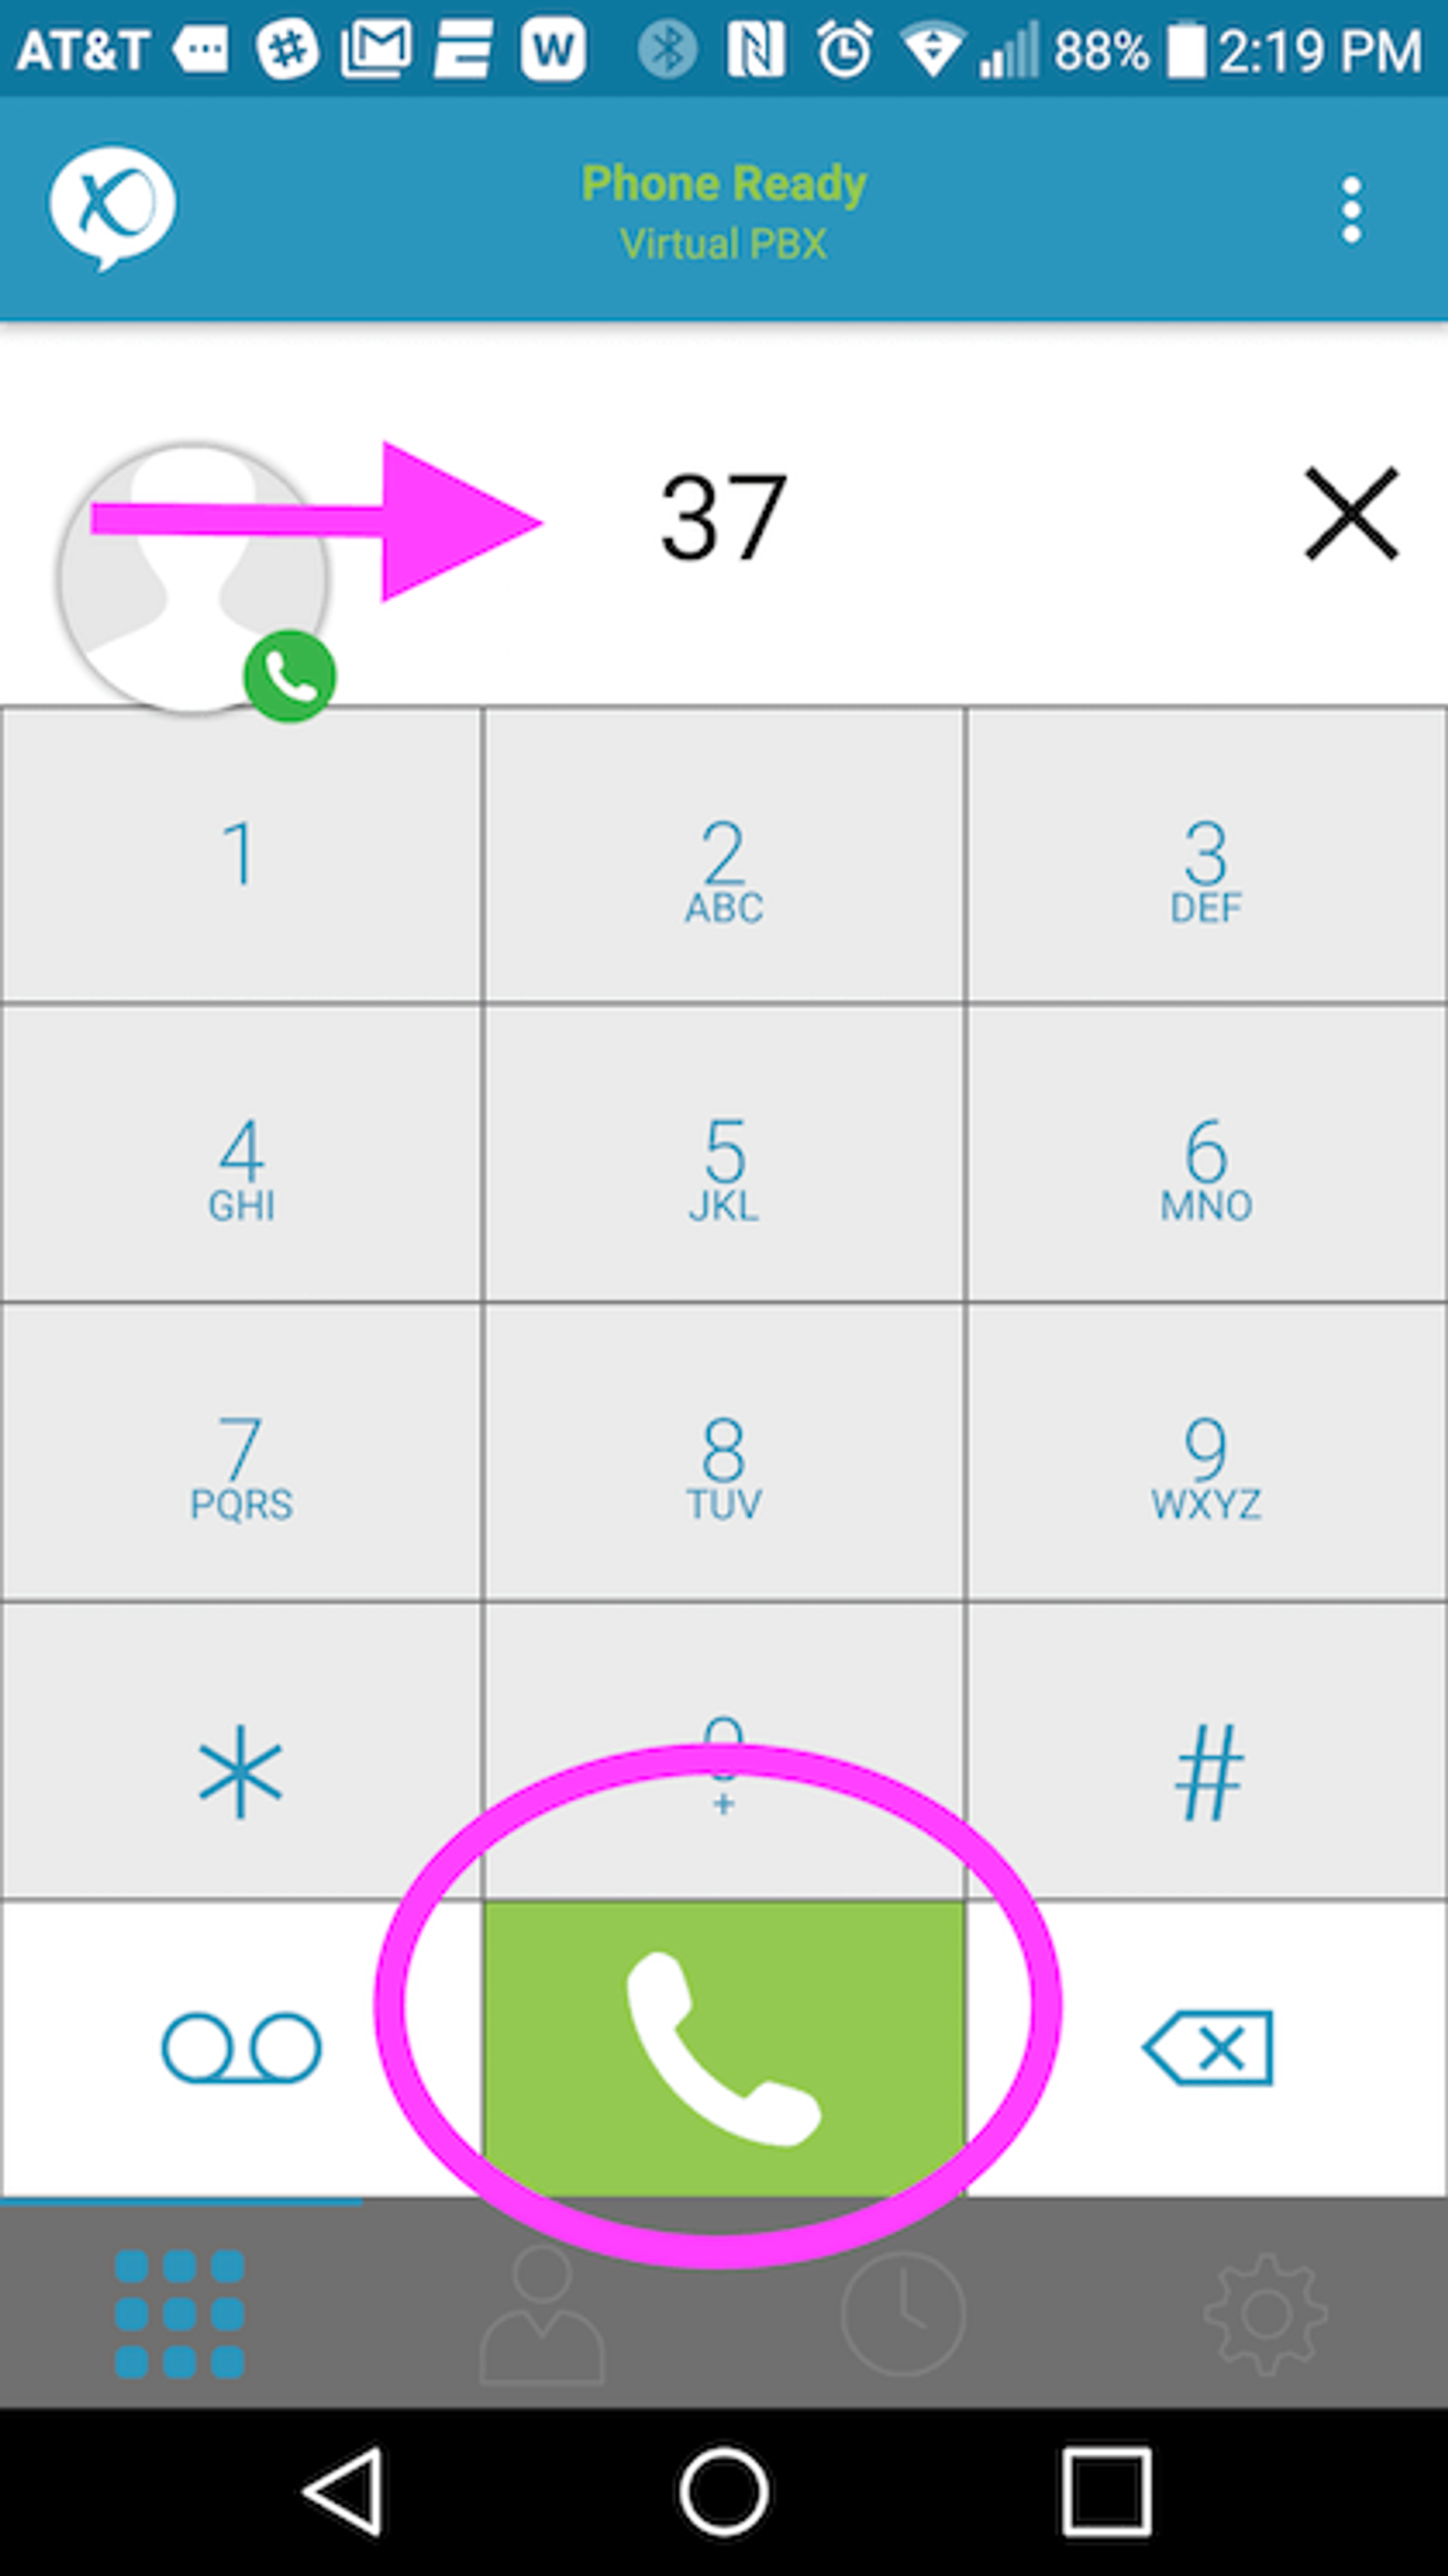
- Enter the extension or phone number you wish to transfer the call to, and then tap the call button. You will be calling the transferee, and can have a conversation prior to transferring the call.
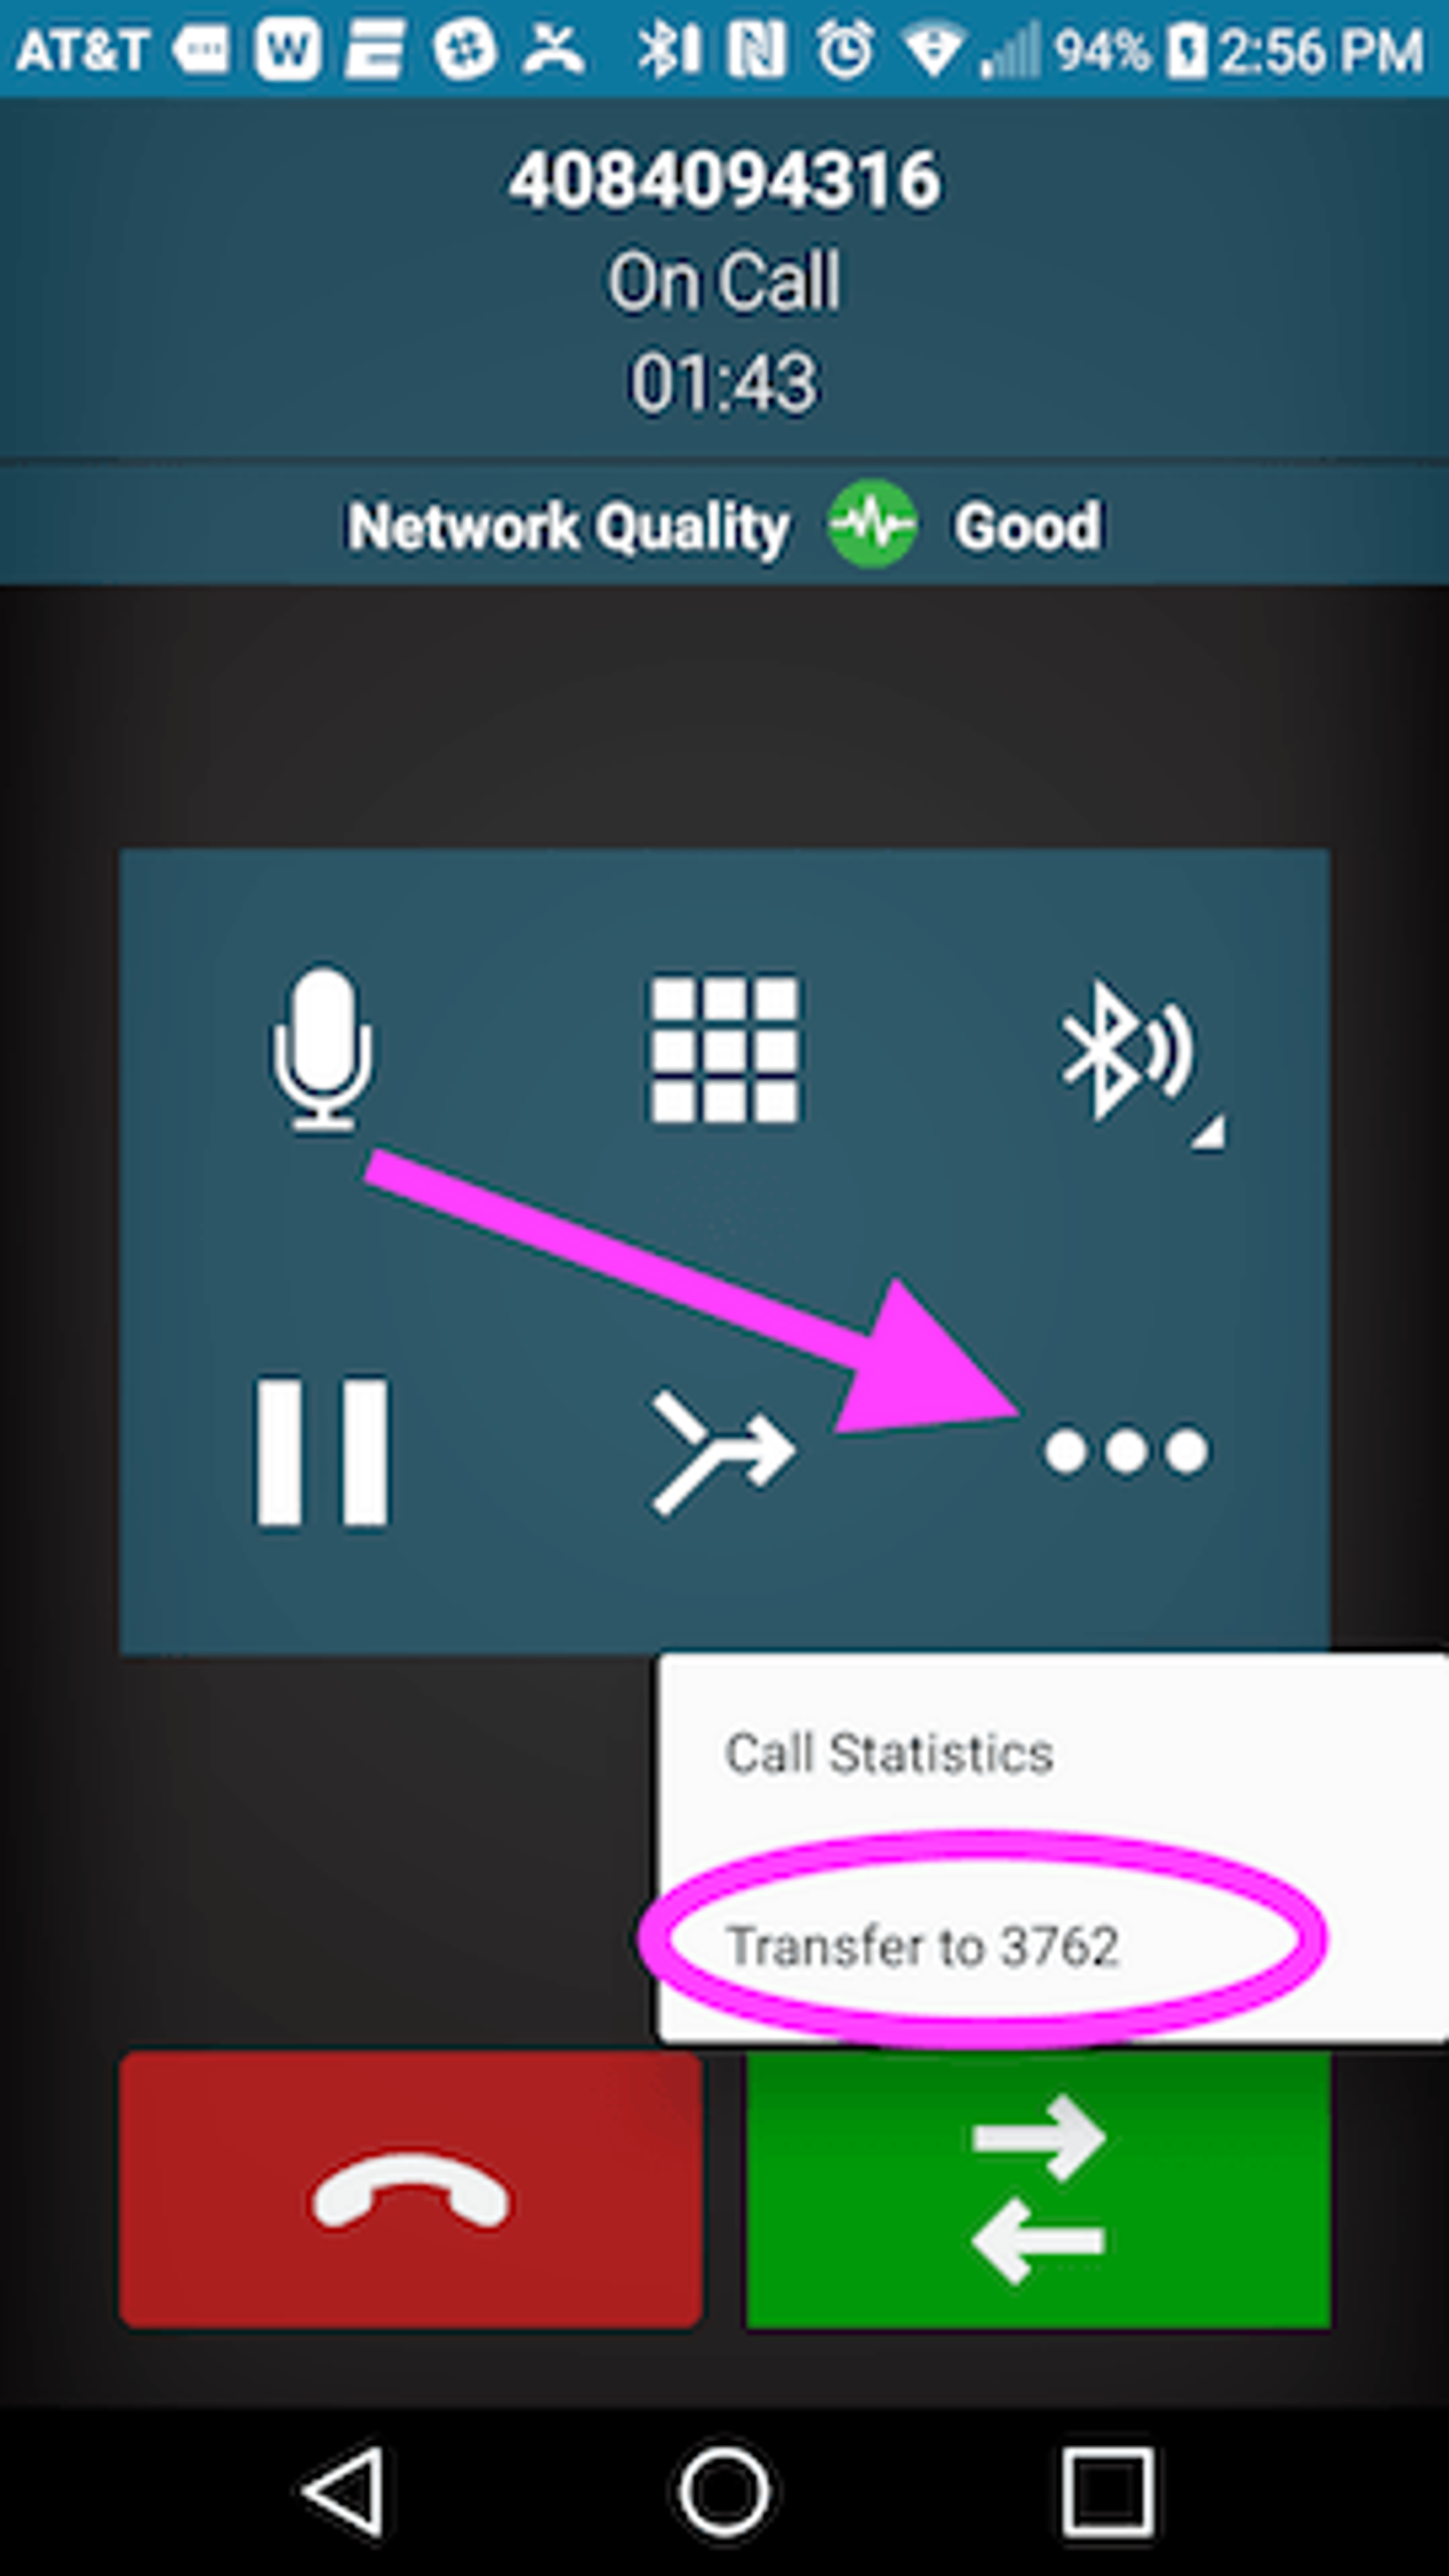
- When you’re ready to connect the customer in to the call, click the More icon (…)
2. Click the “Transfer to” button to finish the transfer to the extension or phone number.
Cold Transfers
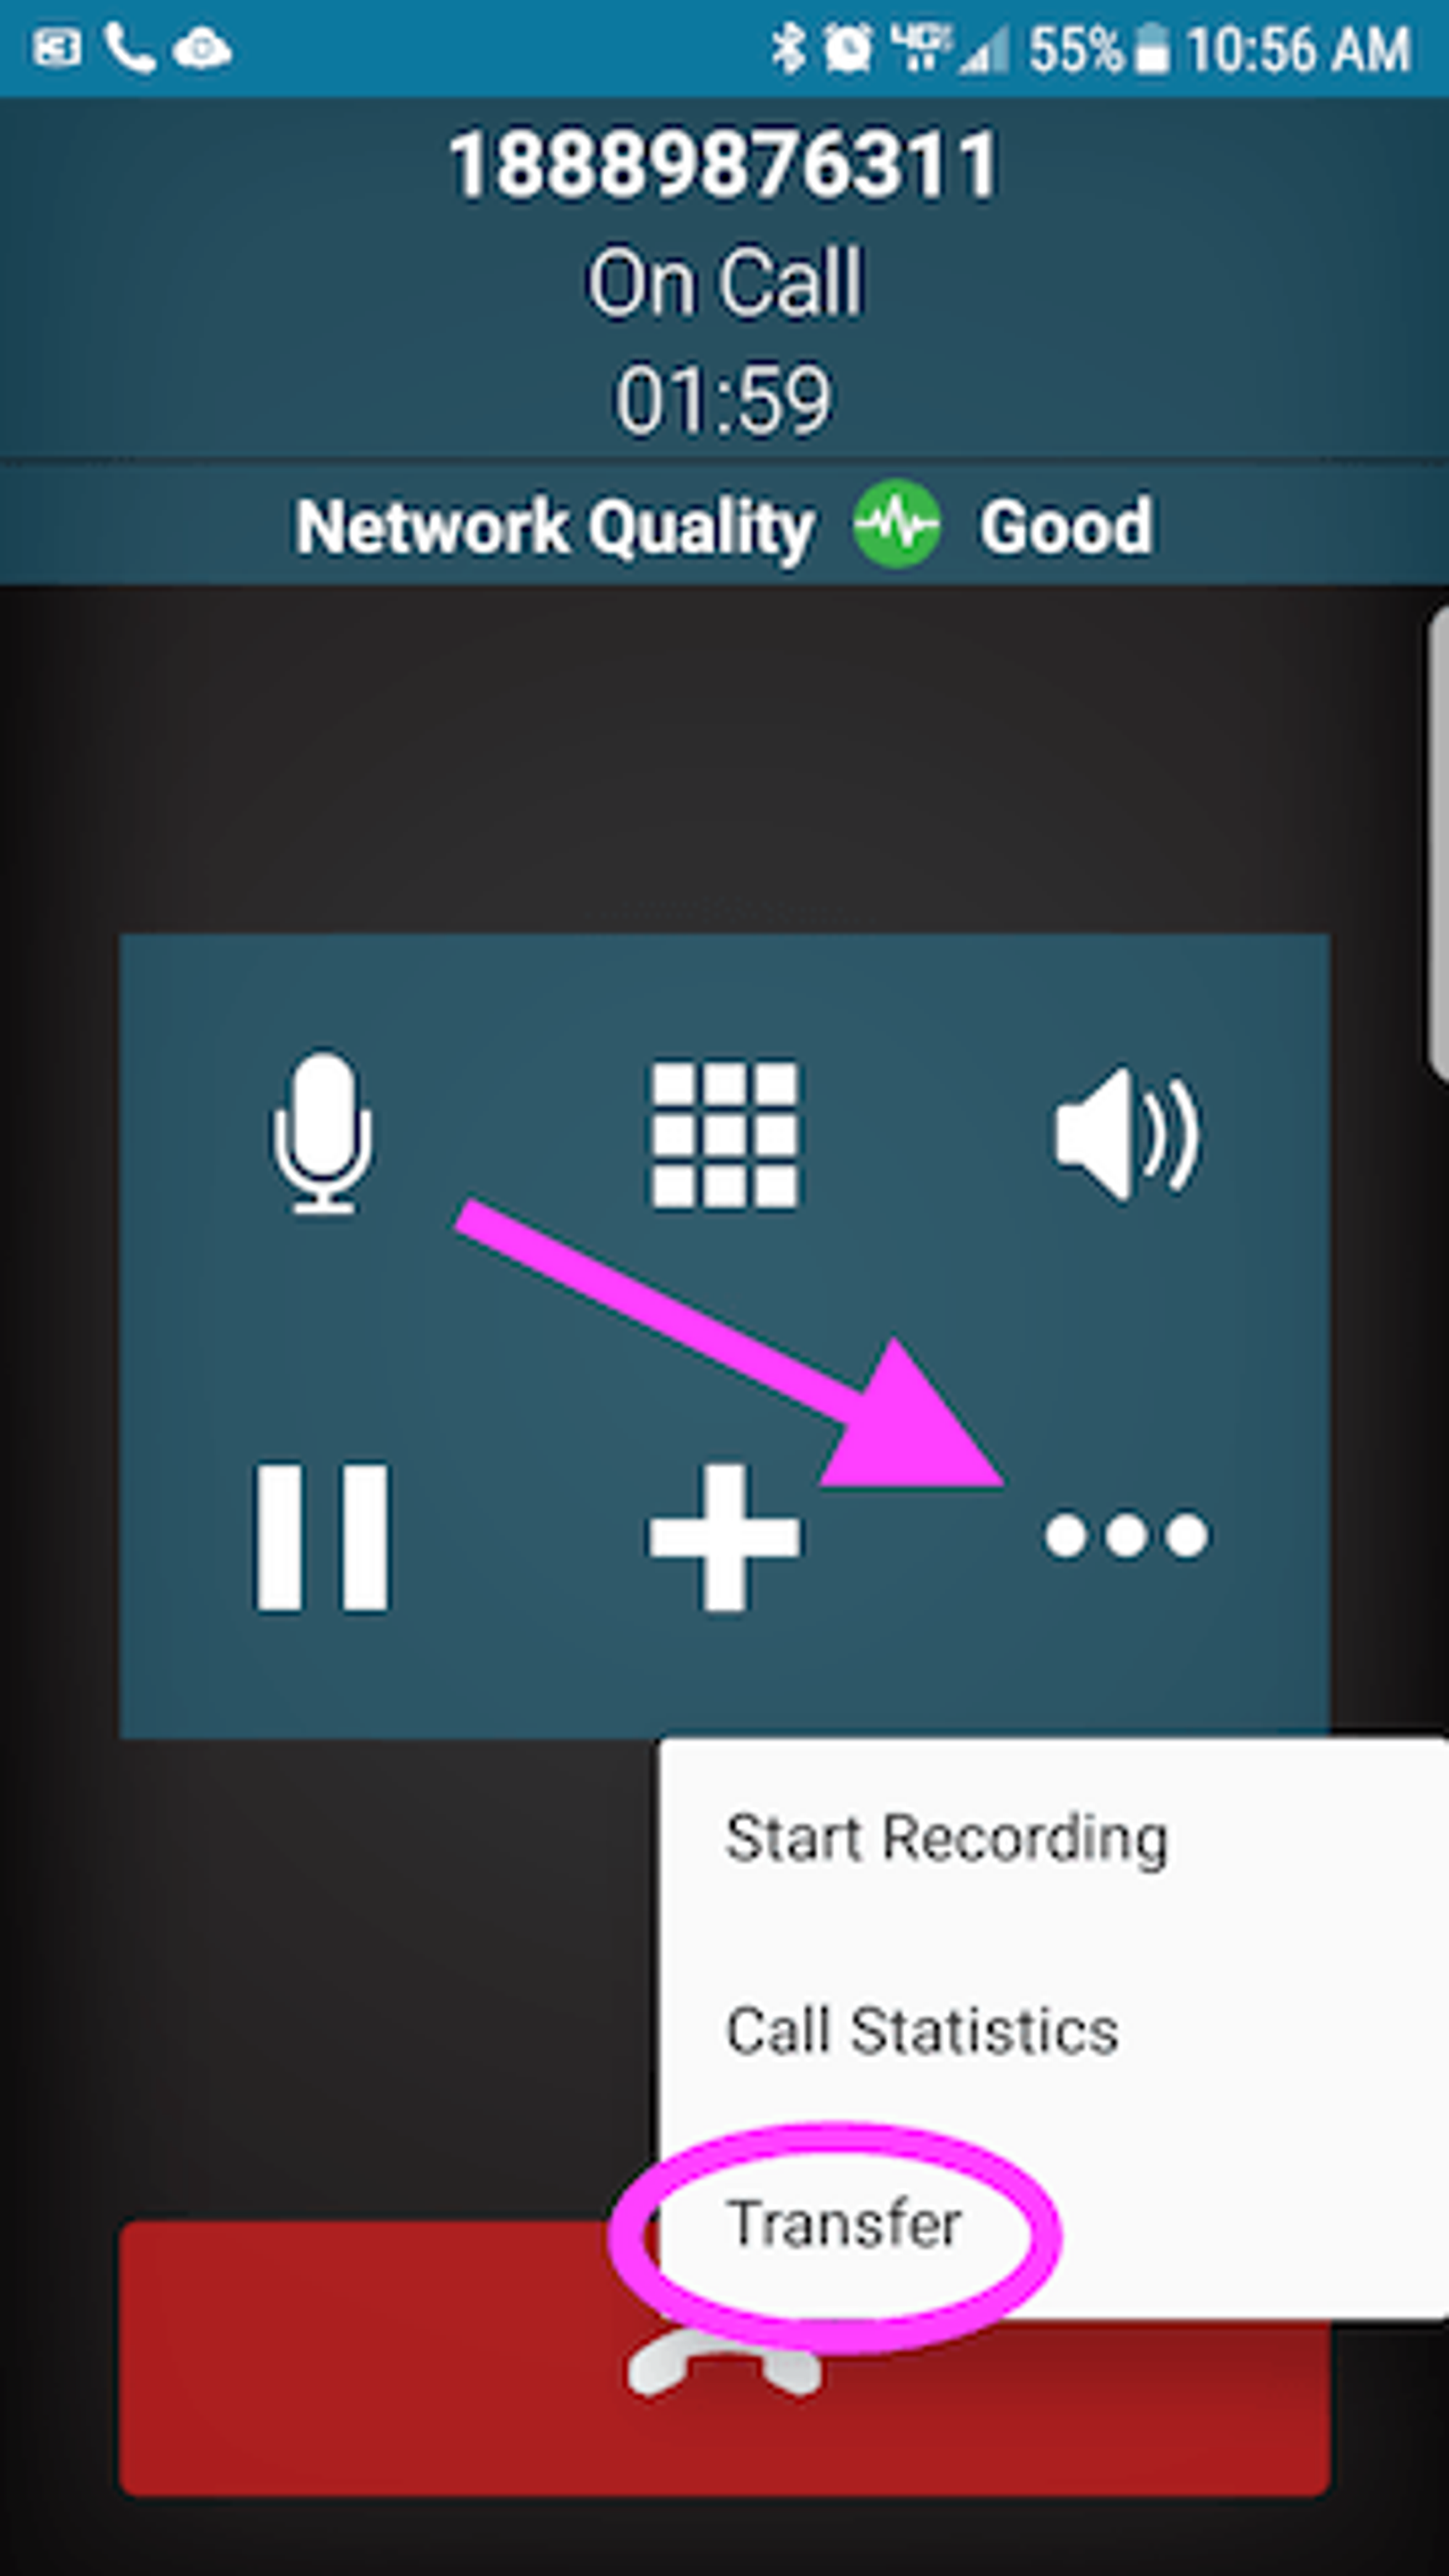
- Tap on the More icon (…) and then Transfer.
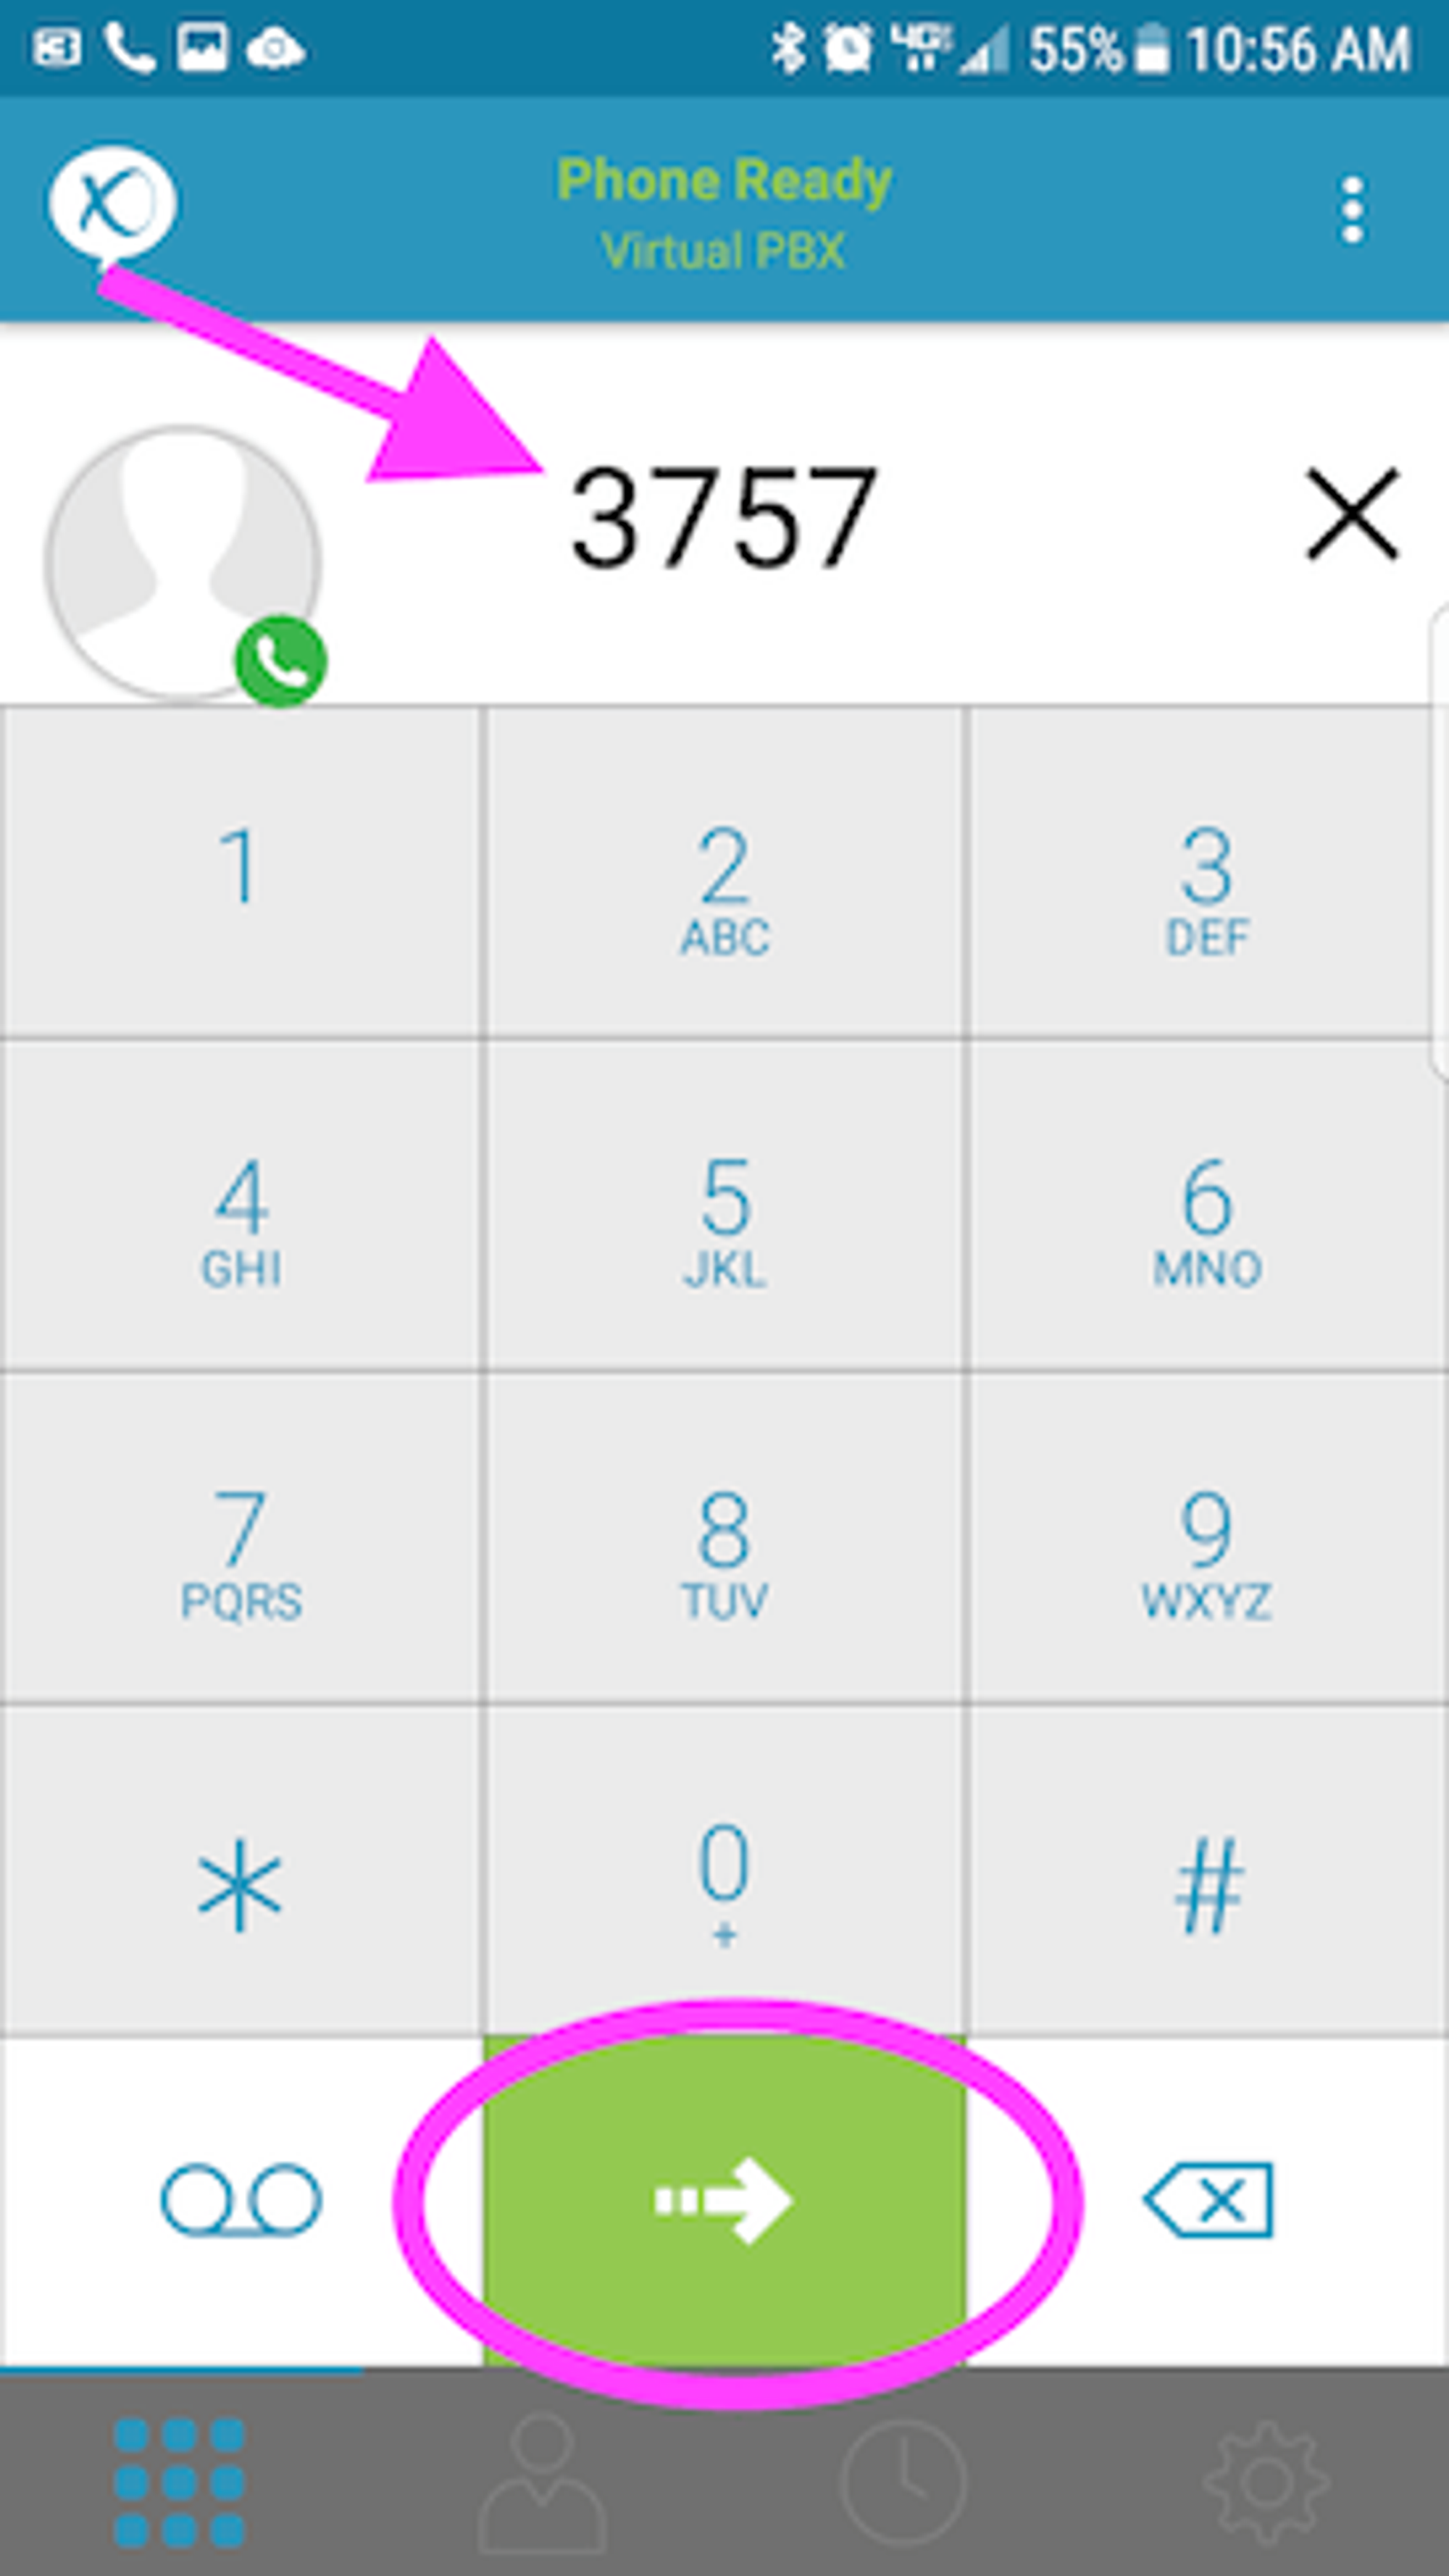
- Enter the extension you wish to transfer the call to, then tap on the green button with white arrow.
Softphone Settings

1: Click on the Hamburger menu to access the configuration menu

1: Click on User Portal to change your password or delete devices you’ve logged in on
2: Tap on Settings to adjust how the app works
3: Tap on logout to logout of the app
4: Tap on Exit to exit the configuration menu
Preferences
After clicking on the hamburger menu, click on the “Settings” page

1: On the “Settings” page click on “Preferences”

1: If you are planning on using your VirtualPBX Softphone on mobile data, enable “Use when available” / “Allow VOIP Calls”.
2: Enable Native Integration
3: Click on “Incoming Call Notification Settings” and make sure all notifications are turned “On”.
User Portal
A new feature for the VirtualPBX softphone is access to the “User
Portal” where you can do things like change your password.
To open, click on the hamburger menu - Select “User Portal”
On the user portal, you have 5 options:

1: Device Logs: These logs are used by our support team when troubleshooting issues with the softphone - In most cases users will not need to navigate to this page. If they need to send logs, they should do so through Settings > Advanced Settings > Verbose Logging > Send Logs instead.
2: Devices: This is where you can see what devices you have logged into the softphone on, and delete logins if you receive a “Device activation limit reached” error.
3: Meeting: This is where you can configure settings for your user conference options on your softphone. Most users will not need to navigate to this page. The Conference bridge should be created and set on your Dash User features instead.
4: Change Password: This is where you can change the password for your softphone login
5: Logout - This will log you out of the user portal
Devices/Device Limits
If you are logging into the softphone on a new device and you receive the error, “Device Activation limit reached”, you can delete old instances of logins via the User Portal.

Click on the “Devices” tab:
1: Under that tab, you should see the instances of the softphone login, with a “delete” option below them. Click on Delete, and you should be able to log in on a new device.
If you continue to experience problems with logging in, please contact VirtualPBX Support.
Change Password
To change your softphone password, you will need to be logged in with your current password.
Click on “Change Password”:

1: Input your current softphone password in the “Old password” field
2: Then, enter your new password in the “New Password” and the “Confirm” box.
3: Hit “Save Changes”: This will complete the password change.
